
Microsoft supports exactly two methods for a PST import to Office 365: network upload using AzCopy, and drive shipping with the WAImportExport tool and BitLocker encryption. For most organizations, network upload is faster because there's no shipping delay and no dependency on FedEx or a data center intake queue. Drive shipping only wins when you're dealing with extremely large data volumes over a constrained internet connection, where uploading terabytes would take days or weeks.
Before you touch either method, confirm two things: you have the Mailbox Import Export role assigned in Exchange Online, and you have Global Admin (or equivalent) access to the Import PST files page in the Microsoft Purview portal. Neither role comes assigned by default.
- Network upload: Best for most organizations, typically completes upload within hours depending on bandwidth and volume.
- Drive shipping: Best for very large migrations (multiple terabytes) or limited network bandwidth; expect a 7–10 business day turnaround after Microsoft receives the drive.
- Both methods: Route through the same Import service, and neither requires a separate Azure subscription.
Quick fact: Once you upload PST files via network upload, you have 30 days to assign them to an import job before Microsoft automatically deletes them from temporary storage.
Key Takeaways
A successful PST import to Office 365 depends on assigning the Mailbox Import Export role, building an exact-match CSV mapping file, and respecting the 30-day upload processing window.
| Point | Details |
|---|---|
| Choose the right method | Use network upload with AzCopy for most migrations; reserve drive shipping for very large data sets or limited bandwidth. |
| Assign roles early | Grant the Mailbox Import Export role at least a day ahead, since Exchange Online permission changes can take up to 24 hours to apply. |
| Match your CSV exactly | FilePath entries must match Azure storage paths case-for-case, or the import job will fail to map files. |
| Respect the 30-day window | Uploaded PST files not assigned to a job within 30 days are automatically deleted from temporary storage. |
| Consider a managed partner | Secure Techies runs assessment-to-verification PST migrations for Southern California businesses that need the project handled end to end. |
Table of Contents
- Prerequisites and Limits You Need to Confirm First
- How Do You Get the SAS URL and AzCopy for Network Upload?
- How Do You Upload PST Files with AzCopy?
- How Do You Confirm Your PST Files Actually Uploaded?
- Creating the PST Mapping CSV: What Each Column Means
- Creating the Import Job and Uploading Your CSV
- Filtering and Starting the Actual Import
- When Should You Use Drive Shipping Instead?
- How Do You Verify the Import Finished Correctly?
- When Should You Just Use Outlook Desktop Import?
- When Does It Make Sense to Bring in a Managed Migration Partner?
- What I've Learned from Watching These Migrations Go Wrong
- Get a PST Migration Handled by People Who Do This Every Week
- Frequently Asked Questions About Importing PST Files to Office 365
- Sources
Prerequisites and Limits You Need to Confirm First
Skipping the prep work is the single most common reason a PST import to Office 365 stalls halfway through. Before you open the Purview portal, walk through this checklist.
Roles and accounts. You need the Mailbox Import Export role assigned to your account or a security group, since this permission isn't included in any role group by default. You also need Global Administrator (or Compliance Administrator) access to reach the Import PST files page inside Microsoft Purview.
Planning checklist before you start:
- Inventory every PST file: location, approximate size, and the mailbox it belongs to.
- Rename files so every PST has a unique filename. Duplicate names across folders will cause mapping conflicts later.
- Test your network throughput if you're leaning toward network upload. A slow uplink changes the math in favor of drive shipping.
- If drive shipping is likely, confirm you have a FedEx account and an internal chain-of-custody process for the physical drive.
- Get sign-off on your data retention plan. Once mail lands in a mailbox, your existing retention policies apply to it.
Hard limits that will bite you if you ignore them. Exchange Online has a message size ceiling, and items larger than 150 MB are silently skipped during import rather than flagged as errors up front. There's also a practical ceiling on folder hierarchy depth inside a PST. Very deeply nested folder structures can cause processing slowdowns or partial imports, so flattening an unusually deep folder tree before upload is worth the effort.
Filename uniqueness matters more than it sounds like it should. The Import service maps files by path and name, so two PSTs named archive.pst in different subfolders can create ambiguous mappings that fail validation.
The 30-day countdown starts the moment a file finishes uploading, not when you create the import job. Pro Tip: Build your CSV mapping file before you start uploading, not after. That way, the moment the last PST lands in Azure storage, you're creating the import job the same day instead of burning a week of your 30-day window on file prep.
Finally, treat your SAS URL and any BitLocker keys exactly like passwords. Anyone with the SAS URL can upload files to your temporary storage area until it expires.
How Do You Get the SAS URL and AzCopy for Network Upload?
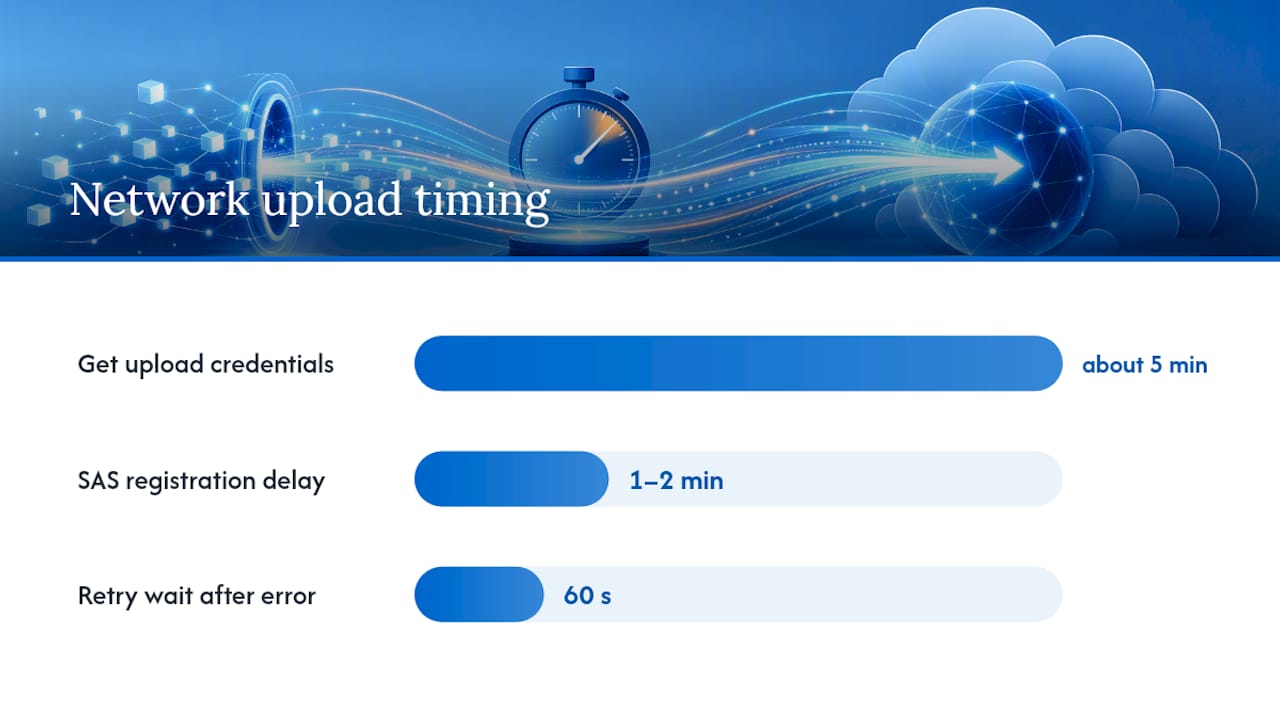
Getting your upload credentials takes about five minutes, but the sequence matters. Here's the path:
- Sign in to the Microsoft Purview compliance portal with an account that has Mailbox Import Export permissions.
- Navigate to Data lifecycle management or Data import and select Import PST files.
- Click New import job, give it a name (use something identifiable, like the department or migration batch it covers).
- Choose Upload your data over the network.
- On the next screen, click Show network upload SAS URL. Copy this immediately, it's your one-time key for this job.
- Click Download Azure AzCopy if you don't already have the tool installed, and save it somewhere accessible from a command line.
The SAS URL (Shared Access Signature) is effectively a temporary password that grants write access to a specific folder in Microsoft's Azure storage. Anyone who has it can upload data there until the signature expires, so don't paste it into a shared chat channel or a ticket that outside vendors can see. If you suspect it's been exposed, generate a new import job and get a fresh SAS URL rather than trying to patch the old one.
One quirk worth knowing about: the SAS URL sometimes takes a minute or two to fully register after you copy it, so if AzCopy throws an authentication error on your very first attempt, wait sixty seconds and retry before assuming something's broken.
Pro Tip: If the "Show network upload SAS URL" button doesn't respond, or the New import job form seems to be missing fields, it's often a screen resolution problem, not a bug. Microsoft's own PST import FAQ notes that low resolutions can hide critical portal controls. Bump your display to at least 1920x1080 before creating the job.
Keep the SAS URL and the AzCopy download in the same working folder on the machine you'll run the upload from. You'll need both again in the next step, and juggling browser tabs while copying a long signed URL is where typos creep in.
How Do You Upload PST Files with AzCopy?
AzCopy is a command-line tool, and once you understand its syntax, uploading PST files becomes a repeatable script rather than a manual chore. The basic command structure looks like this:
AzCopy.exe copy "C:\PSTFiles" "https://[sas URL]" --recursive=true
Your source is a local directory path, not an individual PST file. AzCopy copies everything inside that folder, which is exactly why file naming discipline matters so much before you start. The destination is the full SAS URL you copied from the Import PST files page in Purview.
The --recursive flag changes your folder structure in Azure, and that has a direct consequence for your CSV mapping file. When you include --recursive=true, AzCopy preserves your local subfolder structure inside Azure storage. That means the FilePath values in your mapping CSV need to match those subfolder paths exactly, including case. A path uploaded as HR\Archives\smith.pst won't match a CSV entry written as hr\archives\smith.pst. Windows doesn't care about case; Azure Blob Storage does.
A few practical rules for the upload itself:
- Give every PST file a unique name across your entire migration, not just within one folder, since duplicate filenames elsewhere in the source tree create ambiguous mappings.
- Run AzCopy with verbose logging enabled so you have a record to compare against the Import service's file listing later.
- If you're scripting this in a batch file or PowerShell, escape special characters like
%and&in the SAS URL. An unescaped%in a batch file gets interpreted as a variable reference and will corrupt your URL. - Break very large migrations into batches by department or mailbox group rather than uploading everything in one AzCopy call. Smaller batches are easier to troubleshoot if something goes wrong midway.
On performance: AzCopy uses parallelism by default and will saturate available bandwidth if you let it, which is great until it starves every other application on your network. If you're uploading during business hours, consider throttling with the --cap-mbps flag so you don't degrade VoIP calls or video conferencing for the rest of the office.
Pro Tip: Individual PST files that exceed roughly 20 to 25 GB tend to slow down both the upload and the later analysis phase. If a mailbox archive has ballooned past that size, split it into smaller PSTs before uploading rather than fighting a single oversized file through the entire pipeline.
Once the command finishes, check the AzCopy log summary for failed transfers before you move on. A "completed with errors" status buried at the bottom of a long log is easy to miss if you're just glancing at the last line.
How Do You Confirm Your PST Files Actually Uploaded?
Before building your mapping file, confirm that what you think uploaded actually landed in Azure storage. This step is optional but takes five minutes and saves you from troubleshooting a phantom mapping error later.
Return to the Import PST files page in Purview and select Show network upload SAS URL again, then look for the file listing option, or use AzCopy's list command against the same SAS URL to see what's actually in the container.
- Compare the file count in Azure against your local source folder count.
- Check that file sizes match; a truncated upload often shows a smaller byte count than the original.
- Cross-reference your AzCopy log against the Import service's listing to catch any file that silently failed.
If files are missing, the usual suspects are a corporate firewall blocking outbound HTTPS to Azure endpoints, a SAS URL that expired mid-upload on a long-running batch, or case mismatches between what you expected and what actually got written to the path. Re-running AzCopy on just the missing files, rather than the entire batch, is faster and less risky than starting over.
Creating the PST Mapping CSV: What Each Column Means
The mapping CSV tells the Import service which PST file goes into which mailbox, and it's the single most error-prone part of the entire process. Get the columns right and the rest of the import runs itself.
| Column | What it requires |
|---|---|
| Workload | Always set to "Exchange" for mailbox imports. |
| FilePath | The folder path inside Azure storage where AzCopy placed the file; case-sensitive and must match exactly. |
| Name | The exact PST filename, including the .pst extension. |
| Mailbox | The primary SMTP address of the destination mailbox, or a GUID for inactive mailboxes. |
| IsArchive | TRUE if the PST should import into the mailbox's archive, FALSE for the primary mailbox. |
| TargetRootFolder | The folder inside the mailbox where imported items should land; leave blank to import at the root. |
A sample row looks like this: Exchange, HR\Archives, smith.pst, jsmith@company.com, FALSE, ImportedPST
For inactive mailboxes, you can't use an email address because the mailbox no longer has an active login. Instead, pull the mailbox GUID with a PowerShell command against Exchange Online: Get-Mailbox -InactiveMailboxOnly | Select DisplayName, ExchangeGuid. Drop that GUID into the Mailbox column instead of an SMTP address.
The most common mistakes admins make with this file:
- Typing the FilePath in the wrong case, since Azure treats
Archivesandarchivesas two different folders. - Reusing a PST filename across multiple rows, which confuses the service about which file maps to which mailbox.
- Forgetting to set IsArchive to TRUE for legacy PSTs that should land in the archive mailbox instead of the primary inbox, which floods end users with duplicate mail.
- Leaving stray whitespace or hidden characters in the Mailbox column after copying from Excel, which breaks the match against Exchange Online.
Save the file as plain CSV, not as an Excel workbook. The Import service parser expects comma-separated text and will choke on an .xlsx upload.
Creating the Import Job and Uploading Your CSV
With your mapping file ready, creating the actual import job is mostly a matter of clicking through the Purview wizard carefully.
- Return to Import PST files in the Microsoft Purview compliance portal.
- Select the import job you created earlier (the same one where you got your SAS URL).
- Choose I'm done uploading my files, continue the import process to move past the upload stage.
- Upload your mapping CSV file when prompted.
- Wait for the portal to validate the file. It checks a subset of rows, not the entire file, so a mistake in row 150 of a 500-row CSV might not surface until later stages.
- Review any validation errors shown on screen and correct them in your CSV before resubmitting.
The validation preview only checks roughly the first 100 rows for immediate feedback, so if you're mapping hundreds of mailboxes, don't assume a clean validation screen means every row is perfect. Spot-check a sample from later in the file manually against your Exchange Online mailbox list.
If you get stuck at this stage because the "New import job" button is grayed out or missing, double-check that your account actually has the Mailbox Import Export role assigned. It's easy to have Global Admin rights and still lack this specific permission, since it's a separate role group assignment in Exchange Online that has to be granted explicitly through Exchange PowerShell or the Exchange admin center.
Pro Tip: Assign the Mailbox Import Export role at least a day before you plan to create the job. Role changes in Exchange Online can take up to 24 hours to fully propagate, and there's nothing more frustrating than being blocked by a permission that "should" already be active.
Filtering and Starting the Actual Import
Once your CSV validates, the Import service moves into an analysis phase where it actually reads the contents of every uploaded PST. This is where you get your first real look at what you're importing before committing to it.
The portal surfaces useful insights during analysis, including the age distribution of items and the mix of message types across the whole batch. If half your data is calendar invites from six years ago, this is where you'd notice.
- Date range filters let you exclude anything older than a cutoff, useful when a PST contains a decade of accumulated mail but the business only needs the last two years searchable.
- Item type filters let you exclude calendar items, contacts, or tasks if you only want email imported, or vice versa.
- Trimming is worth doing whenever a PST is unusually large or clearly contains stale data, since smaller imports finish faster and put less strain on mailbox storage quotas.
Retention interaction matters here. Once imported items land in a mailbox that has an existing retention policy or litigation hold applied, those policies immediately govern the newly imported mail. If a mailbox is on hold, items you import can become subject to preservation rules you didn't anticipate, so confirm hold status before you start the import rather than after.
When your filters are set, select Import to Office 365 to kick off the final phase. From here, the service works through the CSV row by row, placing each PST's contents into its mapped mailbox or archive.
When Should You Use Drive Shipping Instead?
Drive shipping earns its place when your data volume makes network upload impractical. A rough rule of thumb: if uploading everything over your current internet connection would take longer than the 7 to 10 business days Microsoft needs to process a shipped drive, shipping wins.
Preparing your drive:
- Download WAImportExport.exe, the Azure Import/Export tool. Microsoft's drive shipping method specifically requires version 1 of this tool, not the newer v2 command set built for general Azure blob transfers.
- Connect an empty, supported hard drive (check Microsoft's compatibility list for supported drive models and interfaces before you buy one).
- Run WAImportExport.exe against your PST source folder. The tool copies files to the drive and encrypts it with BitLocker automatically, generating an encryption key as part of the process.
- The tool also creates a journal file, a manifest that records exactly what was copied and where. Microsoft's data center staff use this journal file to know how to unpack and upload your drive correctly, so treat it as mandatory, not optional documentation.
- Just like network upload, your CSV mapping file's FilePath values need to correspond to the folder structure that ends up on the drive, so build your CSV after the copy step, not before.
Security and shipping logistics:
Microsoft data center personnel receive your BitLocker key through a secure separate channel from the physical drive itself, following the same chain-of-custody principle used in secure file transfer practices for regulated data. Never write the key on a sticky note taped to the drive; that defeats the entire point of encrypting it.

You'll need a FedEx account to ship the drive, since Microsoft's process is built around FedEx tracking and delivery confirmation. Once the drive arrives at the data center, Microsoft uploads its contents to Azure storage within roughly 7 to 10 business days, after which the rest of the process (CSV mapping, job creation, analysis, filtering) mirrors network upload exactly.
Pro Tip: Photograph the drive's serial number and your FedEx tracking number before you ship, and keep both in your migration project file. If Microsoft's team has any question about which shipment corresponds to which import job, having that reference on hand shortens the resolution time considerably.
How Do You Verify the Import Finished Correctly?
The Import PST files page tracks your job through a series of status phases, and knowing what each one means helps you tell a normal wait from an actual stall.
Jobs typically move through Uploading, then (for drive shipping) Drive shipped and Drive received, followed by Analysis in progress, Analysis completed, Import in progress, and finally Complete. A job stuck for days in "Import in progress" on a large batch isn't necessarily broken, since large mailboxes with heavy attachments genuinely take time.
Common errors and how to resolve them:
- Items silently skipped: Usually caused by the 150 MB message size limit. Check the completion report for a skipped-item count and cross-reference against known large attachments.
- Mapping mismatches: A row that never processes is often a case-sensitive FilePath error or a mailbox address that doesn't match Exchange Online exactly. Re-check the CSV against your actual mailbox list.
- Corrupted or unreadable PST: Some Outlook-created PSTs have minor internal corruption. Running Microsoft's ScanPST.exe repair tool before upload catches most of these.
- Job creation fails silently: Nine times out of ten, this is the screen resolution issue mentioned earlier, not a permissions or connectivity problem.
The completion report generated at the end of every import job is your single best troubleshooting document. It lists exactly which items imported, which were skipped, and why, down to the message level. Most admins never open it until something goes wrong, but reading it even on a successful job teaches you what "normal" skip counts look like.
If you need to reprocess failed items, you generally don't need to re-upload the entire PST. Correct the specific CSV row and resubmit just that mapping, and the service will reprocess only what changed.
When Should You Just Use Outlook Desktop Import?
Outlook's built-in import feature has a real, narrow use case: a single end user restoring their own PST into their own mailbox. It's not built for administrators handling dozens or hundreds of mailboxes.
- Classic Outlook: File > Open & Export > Import/Export > Import from another program or file > Outlook Data File (.pst), then select the file and destination folder.
- New Outlook: The import workflow is more limited, and calendar and contact imports may not be fully supported depending on your Outlook build.
- There's no admin-level mapping, no filtering by date or item type, and no way to target an archive mailbox instead of the primary inbox.
Reserve Outlook desktop import for one-off restores, like an employee who found an old PST on a laptop and wants it back in their own mailbox. For anything involving more than a handful of files, the Purview Import service is the right tool.
When Does It Make Sense to Bring in a Managed Migration Partner?
Not every IT team has the bandwidth to run a multi-week PST import project on top of daily support tickets. If your admin team is stretched thin, you're dealing with complex mailbox mappings across departments, or you operate under compliance frameworks like HIPAA, hiring a partner to run the migration removes a significant amount of risk.
Secure Techies handles exactly this kind of engagement for small and mid-size organizations: an initial assessment of your PST inventory and mailbox structure, a pilot import covering a handful of mailboxes to validate the mapping approach, the full migration run, and post-import verification to confirm every mailbox received the right data. Our Microsoft 365 migration work follows this same assess-pilot-execute-verify structure for clients across Southern California.
Pro Tip: Even if you plan to run the migration in-house, having a partner review your CSV mapping file and permission setup before you submit the job catches expensive mistakes for a fraction of what a failed migration costs in rework.
Typical engagement timelines run one to three weeks depending on mailbox count and data volume, with the pilot phase usually wrapping within the first few days.
What I've Learned from Watching These Migrations Go Wrong
Most PST migration failures aren't caused by Microsoft's tooling. They're caused by admins skipping the pilot step because the full migration feels urgent and the pilot feels like a delay.
Run a pilot with three to five mailboxes before you touch the rest. It's the single fastest way to catch a CSV mapping error, a case-sensitivity mistake, or an unexpectedly large PST that's going to choke the whole batch. Name every PST file after the mailbox it belongs to (jsmith_company_com.pst rather than Archive_2023.pst), because six months from now, when someone asks which file went where, that naming convention is the only documentation you'll have left.
The screen resolution issue sounds trivial until it costs you forty-five minutes of clicking through the same broken form. Bump your display resolution before you sit down to create a job, not after you've already hit a wall.
And watch that 30-day clock. It's easy to upload files on a Friday, get pulled into three other fires, and come back the following month to find your window closed. Build your CSV mapping file in parallel with the upload, not after it finishes.
Get a PST Migration Handled by People Who Do This Every Week
Running a PST import to Office 365 on your own is entirely doable with the steps above, but it eats real hours: prepping files, building a clean CSV, watching job status, and troubleshooting whatever error shows up at 4 PM on a Friday. Secure Techies exists for the business owners and IT managers in Southern California who would rather hand that whole process to a team that runs migrations weekly instead of once a year.
What sets a managed migration apart from doing it solo isn't just execution, it's the pre-work: a proper mailbox and PST inventory, a pilot batch to catch mapping errors before they touch production, and post-import verification that confirms every mailbox actually got the right data instead of just assuming the job status said "Complete." For regulated organizations, that verification step also covers whether retention holds and compliance settings carried over correctly, something we build directly into our compliance and security audit process.
If your team doesn't have the bandwidth to own this project end to end, reach out through our managed infrastructure services page and we'll scope your PST inventory and give you a straightforward timeline for getting your mail into Office 365 without the guesswork.
Frequently Asked Questions About Importing PST Files to Office 365
How long does a PST import to Office 365 typically take?
Network upload speed depends on your bandwidth and total data volume, often finishing in hours for smaller batches. Drive shipping adds 7 to 10 business days after Microsoft receives the drive, on top of shipping transit time.
Can I import a PST directly into an archive mailbox?
Yes. Set the IsArchive column to TRUE in your mapping CSV, and the Import service will route that file into the target mailbox's archive instead of the primary inbox.
What happens to items larger than the message size limit?
Items over 150 MB are skipped automatically during import rather than causing the whole job to fail, so check your completion report for a skipped-item count.
Do I need an Azure subscription to import PST files to Office 365?
No. Both network upload and drive shipping run through the Microsoft Purview Import service, which doesn't require a separate Azure subscription.
Can end users import their own PST files without admin help?
Yes, through Outlook's built-in import feature, but it only works for a single mailbox at a time and lacks the mapping, filtering, and bulk capabilities of the admin-level Import service.